How To Put Tennis Balls On A Walker?
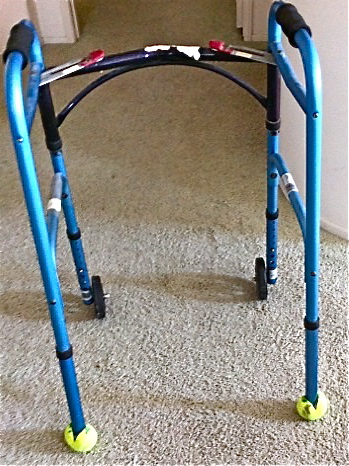
To put tennis balls on a walker, simply cut a small slit in each tennis ball and slide them onto the back legs of the walker. When using a walker, there may be times when you need to add some extra stability or prevent damage to your floors.
One easy and cost-effective solution is to attach tennis balls to the back legs of the walker. By doing this, you create a smoother gliding motion while reducing the risk of slipping and scratching your floors. Putting tennis balls on a walker is a simple process that can be done by cutting a small slit in each tennis ball and sliding them onto the back legs of the walker.
This article will guide you through the steps to ensure a secure and effective attachment of tennis balls to your walker.
The Benefits Of Tennis Balls On A Walker
Putting tennis balls on a walker may seem like a simple, DIY hack. However, this small addition can significantly improve your mobility and safety when using a walker. By understanding the benefits of using tennis balls on a walker, you can make an informed decision for yourself or a loved one. Let’s dive into these advantages:
Cushioning impact to reduce strain on joints
One of the key benefits of using tennis balls on a walker is the cushioning effect they provide. When you walk with a standard walker, each step can create an impact on your joints, particularly your knees and hips. By attaching tennis balls to the legs of the walker, you create a buffer between the hard surface and your body, reducing the strain on your joints.
Tennis balls are made of a soft, rubber material that absorbs some of the shock from walking. This can be especially beneficial if you have arthritis or joint pain, as it helps to minimize discomfort during movement. The added cushioning allows for a smoother walking experience and can even encourage you to stay active and independent.
Enhancing stability and balance
Another advantage of using tennis balls on a walker is the enhanced stability and balance they provide. When the walker legs are covered with tennis balls, the surface area in contact with the ground widens, creating a more stable base. This wider base increases the overall balance of the walker, reducing the risk of tipping or slipping.
Moreover, tennis balls have a texture that provides better traction on various surfaces, such as carpet or uneven pavement. This ensures that your walker maintains a solid grip, giving you the confidence to navigate different terrains without worrying about losing footing.
By improving stability and balance, tennis balls on a walker can help prevent falls and accidents, which are common concerns for individuals with mobility issues. It’s a simple yet effective way to enhance your safety and maintain your independence.
Step-By-Step Guide To Putting Tennis Balls On A Walker
Are you looking to enhance the mobility and stability of your walker? Adding tennis balls to the bottom of your walker can provide a smooth and effortless glide, making it easier to maneuver over various surfaces. In this step-by-step guide, we’ll walk you through the process of putting tennis balls on a walker, ensuring a secure and long-lasting attachment. Let’s get started!
Choosing the right size and type of tennis balls
When it comes to choosing tennis balls for your walker, it’s essential to select the right size and type. Here are a few factors to consider:
Size: Tennis balls are available in different sizes, ranging from standard to mini. Measure the diameter of the legs on your walker to find the appropriate size that will fit snugly.
Type: Opt for durable tennis balls that are designed for outdoor use. These balls are made to withstand various surfaces and provide better traction.
Preparing the walker for installation
Before attaching the tennis balls, it’s crucial to prepare the walker to ensure a secure and stable attachment. Follow these simple steps:
- Clean the walker: Remove any dirt, debris, or adhesive residue from the bottom of the walker legs. A clean surface will promote better adhesion.
- Measure and mark: Measure the desired height on each leg where you want to place the tennis ball. Mark the spot with a pencil or a piece of tape.
Attaching the tennis balls securely
Now that your walker is prepped, it’s time to attach the tennis balls. Follow these steps to ensure a secure and long-lasting attachment:
- Make a hole: Using a sharp object like a knife or scissors, carefully puncture a hole on the marked spot. Ensure the hole is wide enough to fit snugly onto the walker leg.
- Insert the walker leg: Push the walker leg through the hole, ensuring a firm and secure fit.
- Secure the ball: Apply some adhesive to the hole and around the base of the ball. This will provide extra stability and prevent the ball from sliding off.
- Repeat the process: Repeat these steps for each leg of the walker, ensuring consistency and balance.
With the tennis balls securely attached, your walker is now ready to glide smoothly across different terrains. Enjoy the improved mobility and stability that these simple additions provide.
Tips For Choosing The Right Size And Type Of Tennis Balls
Opting for standard size balls
When it comes to putting tennis balls on a walker, choosing the right size and type is essential to ensure a smooth and safe experience. While there are various options available, opting for standard size balls is a popular choice among many users.
Standard size tennis balls are commonly used on walkers due to their versatility and widespread availability. They offer a perfect balance in terms of size and weight, making them suitable for most walkers. These balls can easily slide onto the back legs of the walker, providing stability and preventing damage to floors.
Furthermore, standard size balls can be easily replaced if they wear out or get lost. You can find them at sporting goods stores or online retailers at reasonable prices. This convenience and accessibility make them a preferred choice for many individuals looking to enhance the functionality of their walker.
Considering high-density foam balls for extra durability
If you’re looking for a more durable option to prolong the lifespan of tennis balls on your walker, considering high-density foam balls is a wise choice. These specially designed balls are constructed from a denser foam material, making them resistant to wear and tear.
High-density foam balls offer enhanced durability compared to standard tennis balls, ensuring they can withstand regular use without deteriorating quickly. They are less likely to flatten or compress over time, ensuring a stable and secure walking aid.
Additionally, high-density foam balls provide excellent shock absorption, reducing the impact on your joints as you walk with your walker. This feature makes them an excellent choice for individuals with joint issues or other mobility concerns.
You can easily find high-density foam balls in sporting goods stores or online retailers. While they may be slightly more expensive than standard tennis balls, their enhanced durability justifies the investment.
By considering these tips for choosing the right size and type of tennis balls for your walker, you can enhance its functionality and ensure a safer walking experience. Whether you opt for standard size balls or high-density foam balls, both options provide their own unique advantages, allowing you to customize your walker to meet your specific needs.
Credit: viewfromthehandicappedspace.blogspot.com
Preparing The Walker For Installation
Before you can put tennis balls on a walker, you need to prepare the walker for installation. This involves cleaning the walker’s legs to ensure a secure fit and measuring and marking the placement of the balls to maintain balance and stability. Follow the steps below to prepare your walker for a successful installation.
Cleaning the walker’s legs
To ensure a proper fit, it’s important to clean the legs of your walker before attaching tennis balls. This will remove any dirt, dust, or debris that may hinder the adhesive from sticking properly. Follow these simple steps to clean the walker’s legs:
- First, gather a damp cloth or sponge and a mild cleaning solution.
- Dampen the cloth or sponge with the cleaning solution.
- Thoroughly wipe down each leg of the walker, making sure to remove any dirt or stains.
- Pay special attention to the bottom part of the legs where the tennis balls will be attached.
- Once you have cleaned all the legs, dry them off with a clean towel or allow them to air dry.
By cleaning the walker’s legs, you are creating a clean surface for the adhesive on the tennis balls to adhere to, ensuring a secure fit.
Measuring and marking the placement of the balls
Proper placement of the tennis balls on the walker is crucial to maintain balance and stability when walking. Follow these steps to measure and mark the placement of the balls:
- Start by measuring the diameter of the walker’s legs using a tape measure or ruler.
- Divide the measured diameter by two to find the radius.
- Using a permanent marker or a piece of chalk, mark the calculated radius on each leg of the walker.
- This will ensure that the tennis balls are positioned in the center and provide an even distribution of weight.
By accurately measuring and marking the placement of the tennis balls, you can enjoy a safe and comfortable walking experience with your walker.
With your walker now prepared, you are ready to attach the tennis balls and experience the benefits of better mobility and reduced noise. Stay tuned for our next blog post, where we will guide you through each step of attaching the tennis balls to your walker. Happy walking!
Attaching The Tennis Balls Securely
When it comes to putting tennis balls on a walker, it’s important to ensure a secure attachment. This not only allows for smoother movement but also provides stability and prevents damage to the walker and flooring. There are a few methods you can use to attach the tennis balls securely, such as using adhesive or duct tape and reinforcing the attachment for long-lasting stability.
Using adhesive or duct tape
One easy and convenient way to attach tennis balls to a walker is by using adhesive or duct tape. Here’s how you can do it:
- Start by cleaning the bottom of the walker legs thoroughly to remove any dirt or debris. This will help the adhesive or tape stick better.
- Apply a generous amount of strong adhesive directly onto the bottom of each tennis ball.
- Press the adhesive-coated side of the tennis ball firmly onto the bottom of the walker leg, ensuring it is centered.
- Repeat this process for all the legs of the walker.
- If you prefer using duct tape, cut a strip of tape long enough to wrap around the bottom of the tennis ball and the leg of the walker.
- Wrap the duct tape tightly around the bottom of the tennis ball and the leg of the walker, making sure it is securely attached.
By using adhesive or duct tape, you can easily attach tennis balls to your walker for smoother movement and enhanced stability.
Reinforcing the attachment for long-lasting stability
To ensure the attachment of tennis balls to the walker lasts for an extended period, reinforcing the attachment is essential. Here are a few tips to help you reinforce the attachment and achieve long-lasting stability:
- Regularly check the condition of the tennis balls and the attachment. If you notice any signs of wear or loosening, promptly replace or reinforce them.
- Add an additional layer of adhesive or duct tape around the attachment to provide extra strength.
- Consider using rubber bands or zip ties as additional reinforcements. Place them above the attachment point to secure the tennis ball in place.
- Ensure that the attachment is even and balanced on all legs of the walker to prevent uneven wear and tear.
By reinforcing the attachment, you can enjoy long-lasting stability while using the walker with tennis balls.
Attaching tennis balls securely to your walker not only improves its functionality but also protects your flooring. Whether you choose to use adhesive or duct tape, or reinforce the attachment for long-lasting stability, taking these steps will help you make the most out of your walker. Say goodbye to scuffs and scratches while enjoying smoother movements and added stability.
Maintaining And Replacing Tennis Balls On Your Walker
As you use your walker regularly, the tennis balls on the legs can start to wear out or become damaged. It’s important to inspect them regularly and replace any worn out or damaged balls on time. In this section, we will discuss how to inspect the balls for wear and tear and the importance of timely replacement.
Inspecting the Balls Regularly for Wear and Tear
To ensure the effectiveness and safety of your walker, it’s crucial to inspect the tennis balls on a regular basis. Here are a few steps to follow when inspecting the balls:
- Check for any signs of significant wear on the surface of the ball. This can include cracks, tears, or holes.
- Ensure the adhesive holding the ball to the leg is still intact. If it starts to peel off or becomes loose, it’s time for a replacement.
- Examine the general condition of the ball. If it has become misshapen or flattened, it may no longer provide the necessary cushioning and stability.
By regularly inspecting the tennis balls on your walker, you can catch any damage early on and prevent potential accidents or discomfort.
Replacing Worn Out or Damaged Balls in a Timely Manner
Once you have identified a worn out or damaged tennis ball on your walker, it’s crucial to replace it promptly. Delaying the replacement can compromise the stability and functionality of your walker. Follow these steps to replace the worn out or damaged balls:
- Using a pair of scissors or a knife, carefully cut through the adhesive holding the old ball to the leg.
- Remove any remaining bits of adhesive and clean the leg thoroughly.
- Take a new tennis ball and cut a small “X” on one side using scissors or a knife.
- Place the leg of the walker into the center of the “X” and press firmly to attach the ball.
- Make sure the ball is securely attached and test the walker to ensure proper functionality.
Replacing worn out or damaged tennis balls on your walker in a timely manner will not only enhance the stability and maneuverability of the device, but also contribute to your overall safety and comfort.
Frequently Asked Questions On How To Put Tennis Balls On A Walker?
How Do You Cut A Tennis Ball To Put On A Walker?
To cut a tennis ball for a walker, use a sharp knife and carefully slice a small opening in the ball.
How Do You Cut A Hole In A Tennis Ball?
To cut a hole in a tennis ball, follow these steps: Take a sharp knife or utility blade and carefully slice through the outer layer of the ball. Continue cutting until a hole forms. Be cautious to avoid injury when handling the blade.
What Are The Best Tennis Balls For A Walker?
The best tennis balls for a walker are those that offer high bounce and durability. Look for options with extra duty or all-court specifications, as they are designed to withstand outdoor surfaces. These balls provide good performance and longevity for walkers on the tennis court.
How Do You Walk With A Walker With Wheels?
To walk with a walker with wheels, hold the handlebars firmly, step forward with one foot, then move the walker forward while maintaining balance. Repeat the process for the other foot. Ensure the brakes are engaged before putting weight on the walker.
Keep a comfortable pace and maintain good posture while walking.
How Do You Attach Tennis Balls To A Walker?
To attach tennis balls to a walker, simply cut a small slit in each ball and slide them onto the back legs.
Why Do People Put Tennis Balls On Walkers?
People put tennis balls on walkers to reduce friction, making it easier to maneuver and providing a smoother walking experience.
Conclusion
Overall, incorporating tennis balls onto a walker is a simple but effective way to enhance stability and mobility. By following these step-by-step instructions, you can easily install tennis balls on your walker and enjoy the benefits they offer. From protecting your floors to providing smoother movement, these ingenious additions offer a practical solution for anyone in need of extra support.
So why wait? Try it out, and experience the difference for yourself!